Follow-up sequence builder
Design multi-step, behavior-based follow-up flows on a visual canvas — with 10 ready-made presets.
The Follow-up Sequence Builder turns a single email into a complete, multi-step outreach journey. Design automated sequences on a visual canvas — add follow-up steps, set delays between each touchpoint, branch on recipient behavior, and personalize every message with AI — all without writing a line of code.
Build smart follow-up sequences that keep conversations moving and help turn more prospects into meaningful replies.
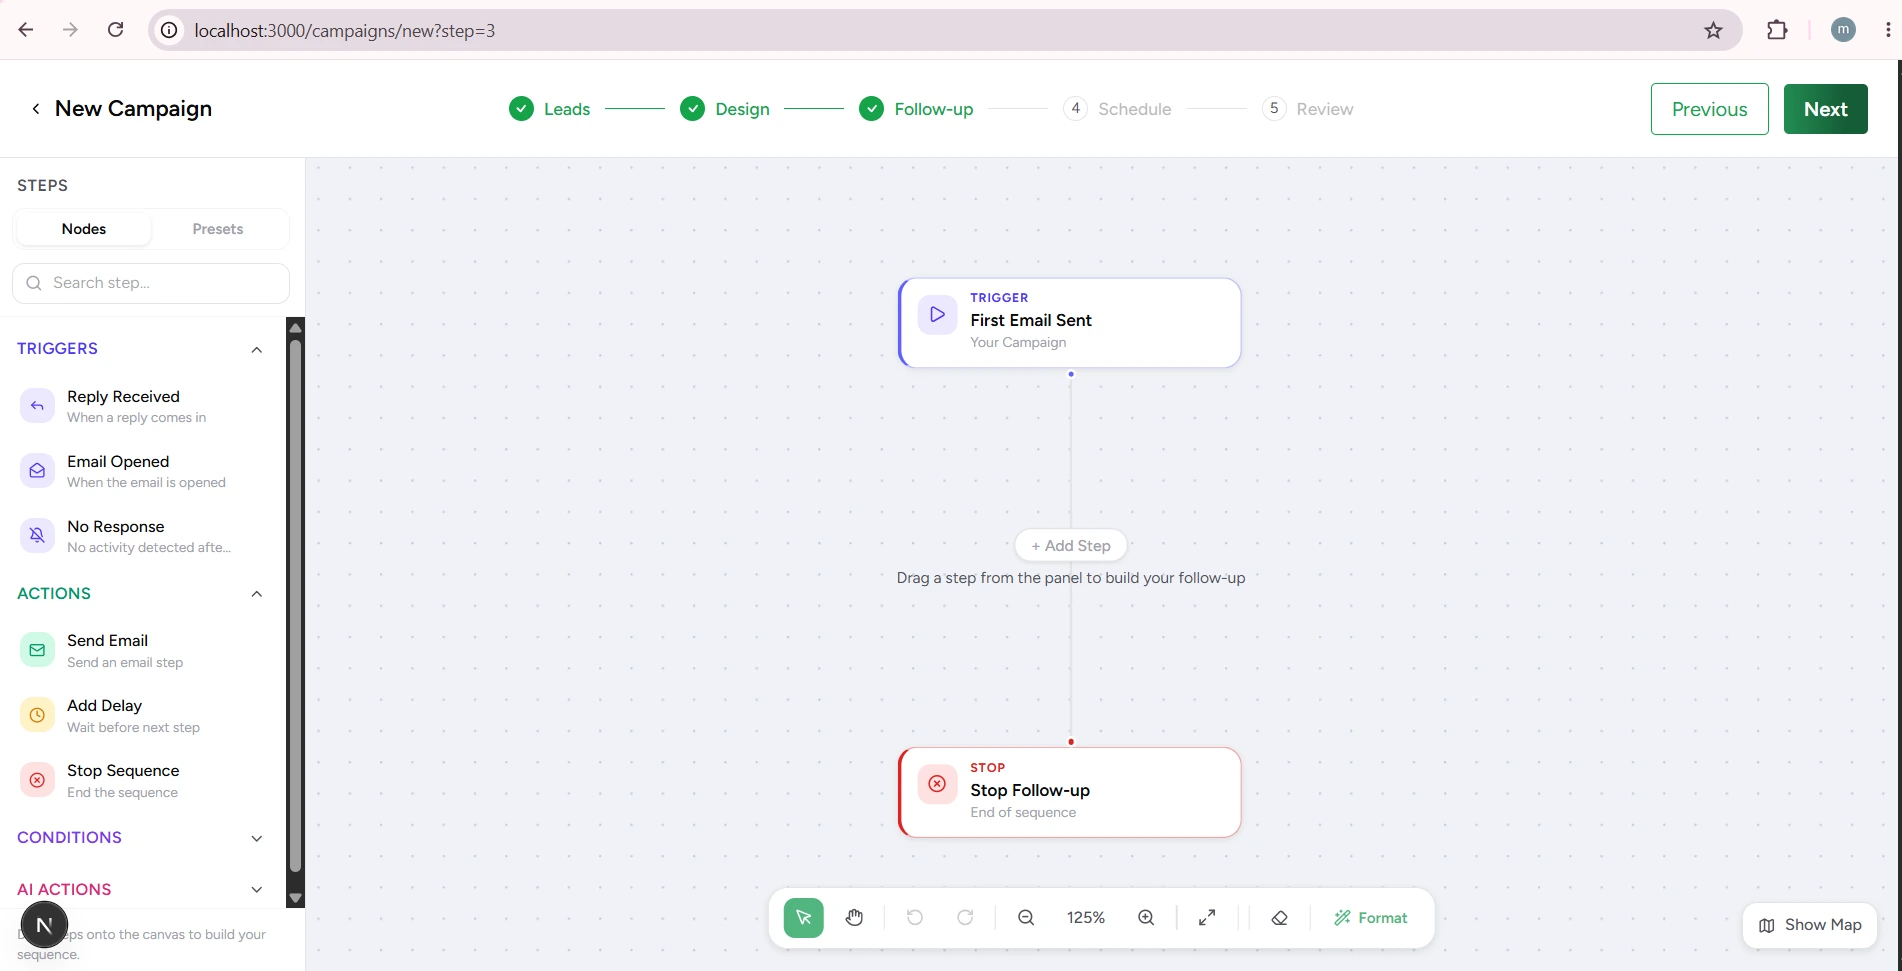
Workflow components
Triggers
Reply Received, Email Opened, and No Response (a configurable inactivity window) fire based on how a lead engages with the emails already sent — the events that decide when your sequence should react.
Actions
Send Email opens the same template/subject configuration as the main Design step, and Add Delay pauses the sequence for a set number of hours or days before the next step runs.
Conditions
If Opened and If Replied split the sequence into Yes and No paths — route leads who engaged down a different path than those who stayed silent. Both need a Wait or No Response step before them, since a condition checked the instant an email sends would always come back No.
AI Generate Email
The AI action — Stynar writes the full subject and body automatically, in whichever tone you pick (Professional, Friendly, Concise, or Persuasive), based on the thread's context. No manual composing required.
Building a follow-up sequence
Open the Follow-up step
After Design, the canvas opens with two nodes already placed — First Email Sent and Stop Follow-up — connected by a single empty edge, ready for you to build between them.
Drop in your first step
Drag a node from the sidebar onto the canvas or onto the connecting line, or click the line to open the Add Step popover. Triggers, Actions, Conditions, and AI actions are grouped and color-coded so the right piece is always easy to find.
Configure each node
Click a placed node to set it up — a delay's wait duration, a No Response trigger's inactivity window, an AI email's tone, or a Send Email node's subject and body.
Branch with conditions
Drop in If Opened or If Replied and Stynar automatically spawns both a Yes and a No branch for you to build out independently — no manual wiring required.
Zoom out and check the shape
Use Fit View to see the whole sequence at once, and trace every branch to confirm it ends in either Stop Sequence or a defined next step — never a dead end.
Continue to Schedule
Your flow saves automatically as you build. Click Next to move on to the Schedule step and decide when this whole campaign actually goes out.
Canvas controls
| Field | What it means |
|---|---|
| Select / Pan | Toggle between clicking to select a node and dragging to pan across the canvas. |
| Undo & Redo | Ctrl+Z / Ctrl+Y (Cmd on Mac) step backward and forward through your edit history. |
| Zoom & Fit View | Zoom in for precise node placement, zoom out for the big picture, or hit Fit View to frame the entire flow instantly. |
| Format (auto-layout) | Auto Detect, Portrait, or Landscape — instantly re-arranges every node into a clean, readable structure in the direction you choose. |
| Clear canvas | Wipe the flow back to the two starting nodes and rebuild from scratch — still covered by undo if you change your mind. |
| Mini-map | Toggle a small overview map for orienting yourself inside long, wide-branching sequences. |
Conditional branches, built for you
10 ready-made presets
Undo history protection
Step limits scale with your plan
Best practices
Start with a simple sequence
Begin with a 2–3 step linear follow-up before adding conditional branches. Simple sequences are faster to configure, easier to test, and simpler to optimize based on results.
Use conditions selectively
Only branch when engagement data meaningfully changes what a lead should receive. Over-branching creates maintenance complexity without a proportional gain in performance.
Validate every branch
Before saving, trace both the Yes and No path of every Condition node to confirm each one leads to a defined next step or a deliberate endpoint — never a dead end.
Run Format regularly
After adding nodes or restructuring paths, use the Format button to keep the canvas tidy. A clean layout makes it far easier to spot gaps and review the sequence flow.
Use presets as a starting point
Load a pre-built template to skip manual setup for common patterns, then customize the steps, delays, and conditions to match your specific campaign goals.